See additional instructional material below:
To give yourself a simple demonstration of neuromuscular feedback, all you need is a few minutes with a willing partner to serve as tester, Your partner does not need to know any background or detail; all they have to do is follow these simple instructions.
This is the position for conducting neuromuscular feedback. This will be used for checking polarity.

1 Palm to head
Place your hand lightly on top of your head, palm down. It doesn’t matter which hand you use. Hold the other arm out to the side and have your tester apply slight downward pressure.
2 Back of hand to head
Now turn your hand over, so that the back of your hand is resting against your head. Have your tester apply downward pressure again.
Remember that the difference between testing strong and testing weak is slight, typically from 5 to 15 percent. This will normally be enough to feel a distinct difference.
These are the illustrations for checking for biofield polarity. Figure A should test strong and figure B should test weak if the person is properly polarized.

These are illustrations of a test resulting in ‘Reversed Biofield Polarity’ and notice the position of the palm of the person’s hand over top of their head. Disrupted or disorganized polarity may also yield a weak response on both positions of the hand over top of the head, or a strong response in both palm positions over top of the person’s head.
Balanced breathing takes about two minutes. Sitting in a straight-back chair is best, but Balanced Breathing can be done while lying down or in a standing position.
1. Cross your left ankle over your right ankle.
2. Extend both arms straight out in front of you.
3. Cross your right arm over your left arm at the wrist.
4. Rotate the palms of your hands so that they are facing and interlock your fingers.
5. Rotate your hands down toward your stomach.
6. Continue rotating inward so that you bring your hands up close to your chest. At this point you have crossed the center line of your body with your hands, arms and legs.
Once in the proper position, inhale through your nose while touching the tip of your tongue to the roof of your mouth. Exhale through your mouth, resting your tongue on the floor of your mouth.
Focus your thoughts on the concept of balance. It might be the idea of the balance of mind and body or just the word “balance.” At the same time picture in your mind an image that represents balance. This could be the image of a scale, or standing on one foot. Throughout the two-minute process, breathe comfortably. Don’t worry if you are not always able to hold the thought or image; come back to it if you drift away.
Video Demonstration
Tap sequence for Emotional Trauma
- Check SUDS
- Balanced Breathing
- Polarity Reversals
- Tap Sequence:
Eyebrow → Outside Eye → Under Eye → Under Arm → Collarbone → Thumbnail → Under Arm → Collarbone → Little Fingernail → Collarbone → Index Fingernail
- Bridge
- Repeat Tap Sequence
- Recheck SUDS
- Eye Roll
Choose a statement that fits the situation most closely or use a variation that feels appropriate to your situation.
INTENTION STATEMENT—ANGER
“I forgive them/him/her, because they could not have done differently.”
Alternatives:
“I forgive him/her but I do hold him/her accountable.”
I let go of this anger for my own well-being.”
“There is forgiveness in my heart.”
INTENTION STATEMENT—GUILT
“I forgive myself, I know that I could not have done differently.”
Alternatives:
“I forgive myself, I did the best I could under the circumstances.”
“I couldn’t help it at the time.”
“There is forgiveness in my heart for my own well-being.”
Here are all the tap treatment points that you will use. Most of these sites are bilateral, meaning that there is a tap site on either side of the body.
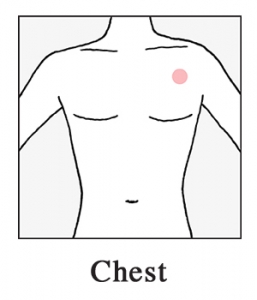
Chest: This is the only site that employs rubbing instead of tapping. The Chest spot is located above the heart, about three inches off the center line of the body. It is sometimes referred to as the “sore spot,” because in many people the spot is tender compared to the surrounding area. To locate the spot, probe in that area until you feel a tender spot. Using two or three fingers, run in a tight circular motion, about one revolution per second, outward toward your shoulder and down toward your heart. It is important to maintain a firm steady pressure as you rub, as if you were massaging oil deeply into that spot.
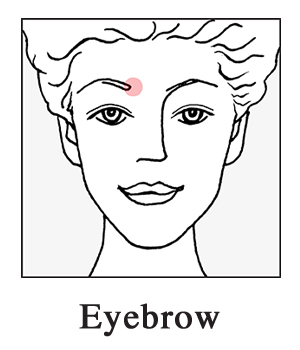
Eyebrow: The Eyebrow location is at the inside of the eyebrow, in a vertical line with the inner edge of the eye, close to the nose. It is best activated by tapping directly at the site with two fingers or by tapping with the flat of one finger across the bridge of the nose, covering the inner edges of both eyebrows.
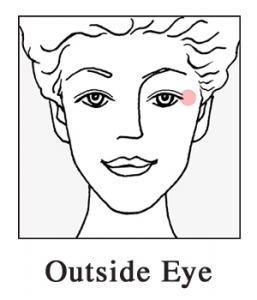
Outside Eye: The Outside Eye location is on the bone of the eye socket at the outer edge of the eye, on a horizontal line with there pupil of the eye. Tap with one or two fingers.
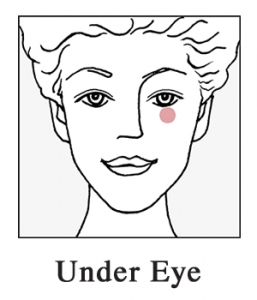
Under Eye: The Under Eye spot is located at the bottom of the eye socket, in a direct line below the pupil. Because it is very close to the surface of the skin, it can be activated by taping gently on the long ridge beneath the eye with one or two fingers.
Under Nose: Tap with one or two fingers directly in the center between the nose and upper lip.

Under Lip: Tap with one or two fingers directly in the center on the chin just below the lower lip.

Collarbone: The Collarbone location is at the indentation where the collarbone joins the sternum, or breastbone. You can locate this spot by tracing along your collarbone from your shoulder inward toward the center of your body with your fingers until you hit the hard downward angle at the juncture with the breastbone. If you tap with all four fingers in that general vicinity, one of them will always be activating the site.

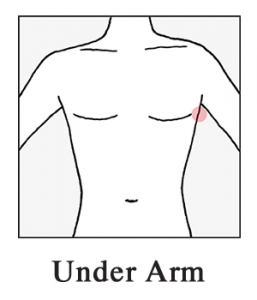
Under Arm: The Under Arm location is on the side of the body about four inches below the armpit. It is best activated by tapping with all four fingers, using the opposite hand. Tapping also can be done with the hand on the same side by curving the fingers back and tapping the the backs of the fingers.
Side of Hand: Locate the Side-of-Hand spot may making a fist and noting where the palm creases on the side of your had just below the knuckle of the little finger. It’s the “karate chop” spot. The surest way to activate this spot is to do the tapping with the flat of all four fingers of the opposite hand.

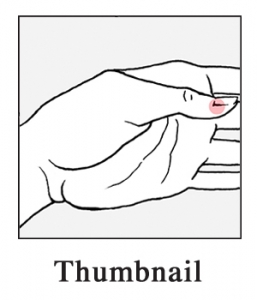
Thumbnail: The Thumbnail site is located at the outside edge of your thumbnail (not the side that faces your index finger). Tapping with two fingers on the edge of the thumbnail seems to work best.
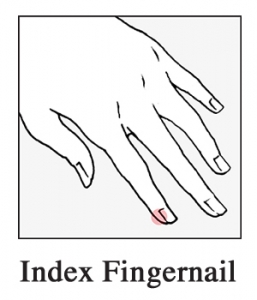
Index Fingernail: The Index Fingernail site is at the base of the fingernail of the index finger on the side nearest the thumb. Tap with the index finger or first two fingers of the opposite hand.
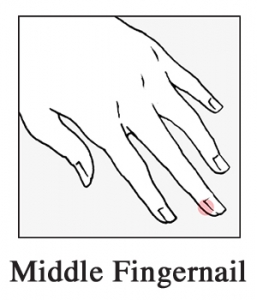
Middle Fingernail: The Middle Fingernail site is at the base of the fingernail of the middle finger on the side nearest the index finger. The site can be tapped wight the index finger or the first two fingers of the opposite hand.
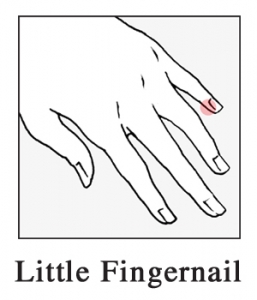
Little Fingernail: The Little Fingernail location is at the base of the fingernail of the little finger on the edge closest to the ring finger. The site can be tapped wight the index finger or the first two fingers of the opposite hand.
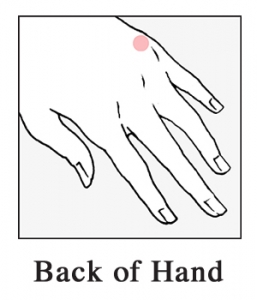
Back of Hand: To locate the Back-of-Hand spot, make a fist with one hand. On the back of your hand, locate the depression, or valley, between the knuckle of your pinky finger and the knuckle of your ring finger. Now trace back about an inch in the direction of your wrist in the valley formed between the tendons of your pinky and ring fingers on the back of your hand. This is the Back-of-Hand spot. Now that you’ve found it, you can release your fist.
To perform the Back-of-Hand Tap, use the flat of three or four fingers of your opposite hand and tap or lightly slap the Back-of-Hand spot.
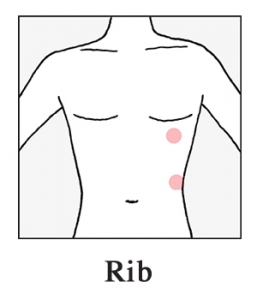
Rib: The are two possible rib treatment sites. The first is directly below the nipple between the sixth and seventh ribs. On a woman, this would be about the place where the base of a bra touches the ribs. If the first site is uncomfortable to tap or difficult to access, tapping may be done on the side of the body, where the rib cage begins, about the halfway point between the armpit and the level of the navel. This tap point is seldom used.
Throughout these exercises, keep your head level, facing straight ahead. Move only your eyes, not your head.
This is a part of the Protocol for all emotional targets. It fits between two Tap Sequences and serves to activate various regions of the brain as you activate the Back of Hand treatment site.
Eye Roll
Begin with your eyes closed. Open your eyes, look down (at the floor if you’re standing, or into your lap if you’re sitting), and with your eyes, slowly trace an imaginary line straight forward across the floor to the wall in front of you. Continue slowly rolling your gaze up the wall to where it meets the ceiling and then back toward you across the ceiling until you are looking above you; stop there. Give it a try now – the whole sequence should take about eight seconds.
Once you feel comfortable doing the Eye Roll, add the Back-of-Hand Tap, keeping up a steady tapping rhythm all the way through. The Eye Roll sequence consists of the eight-second eye movement while continuously tapping the Back-of-Hand spot.
The Bridge
The objective of The Bridge is to integrate the emotional thought throughout the various regions of the brain. Counting is a left brain hemisphere activity while music (humming a short tune) is a right brain activity. The eye movements activate the visual cortex and other brain regions. Below are the instructions.
 The Bridge is a series of eye movements, humming, and counting done while continuously tapping the Back of the Hand acupoint.

Begin with your eyes open. Remember to tap the Back of Hand spot during the entire time you do these eye movements, humming and counting.
2. Close your eyes.
3. Open your eyes and while holding your head level, glance down to the right.
4. Glance down across to the left.
5. Rotate your eyes in a 360 degree circle to the left. Make certain to move your eyes in a full circle not cutting across any parts of the full sweep.
6. Next, rotate your eyes in a full circle to the right. If it helps to make a couple of circles in each direction that is fine.
7. Count from 1 to 5.
8. Hum a few notes of a familiar tune such as, “Happy Birthday to You,” or “Row, Row Your Boat.” You can even make up a tune of your own.
9. Count back from 5 to 1.
Try this a few more times. Practice so that you can do the nine steps from memorry or with the aid of the visual prompts provided. Then continuously tap the Back-of-Hand spot as you go through the whole sequence.
Video Demonstration
This is the remedy of the first resort. As its name implies, these add-on polarity reversals amplify, or “boost,” the effectiveness of the standard ones. In most cases, these booster reversals will eliminate any residual reversals and help you get to 0, or to the level that you want to be. There are two booster reversals:
Repeat three times while rubbing the Chest site: “I deeply and completely accept myself, even if I am not completely over this problem.”
Repeat three times while tapping the Under Nose: “I deeply and completely accept myself, even if I am not completely over this problem.”
Rating the Intensity of Your Emotions
Naming your emotions tells you what your feel. The SUD scale tells you how much you feel. In the 1950s psychiatrist Joseph Wolpe developed a scale to help patients rate their discomfort or distress in increments 0f 0 to 100. This measure, known as the Subjective Units of Disturbance Scale, or SUDS, has become a standard means of self-evaluating individual experience. We use a simplified version of the scale, with increments of 0 to 10. Considering that what brings people to seek out mental or physical help is their subjective experience of distress, it makes sense to give their personal report a voice in evaluating improvements or change. Diagnosis of physical problems frequently relies on patients’ own reports of how they are feeling.
The changing distress level is your personal measure of treatment effects. At several points during the course of the treatment, you well reevaluate the level to monitor your progress and to see if additional treatment is needed. This also serves to keep your thoughts focused on the target emotion or problem. It is virtually impossible to rate your distress about a specific problem and not be thinking about it.
The following chart describes each level of distress on the 10-point scale.
0 – The absence of any distress. Feeling calm and totally relaxed.
1 – Neutral feeling or just OK, not as relaxed as could be.
2 – A mild irritation. First awareness of tension or vague stress.
3 – Increased discomfort, unpleasant, but in control.
4 – Noticeable discomfort or distress, perhaps agitation, but tolerable.
5 – Discomfort is very uncomfortable, but I can stand it.
6 – Discomfort worsens and affects my life.
7 – Discomfort is severe and emotional pain interferes with life.
8 – Discomfort increases and it is in my thoughts constantly.
9 – Discomfort is nearly intolerable.
10 -Discomfort is extreme and the worst imaginable. I feel panicky and overwhelmed.
